Jell-O No Bake Crust Mix Instructions
Creating a no-bake crust with Jell-O is simple! Combine graham cracker crumbs, melted butter, and sugar. Press firmly into a pie plate. For a perfect crust, refrigerate for one hour to allow the crust to set before adding your filling.
What is Jell-O No Bake Crust Mix?
Jell-O No Bake Crust Mix is a convenient product designed to simplify the process of making desserts, especially cheesecakes and pies. It’s a pre-made mixture primarily composed of graham cracker crumbs, sugar, and sometimes other ingredients like spices, intended to form the base of a no-bake dessert. The key feature is its ease of use; it eliminates the need to measure individual ingredients and bake the crust in an oven.
The mix typically requires the addition of melted butter or margarine to bind the crumbs together, creating a firm and flavorful foundation for fillings. This makes it an ideal option for those seeking a quick and hassle-free dessert solution, perfect for busy schedules or situations where baking facilities are limited. Jell-O No Bake Crust Mix offers a consistent texture and taste, ensuring a reliable base for your favorite no-bake creations.
It’s commonly used in cheesecakes, pies, and other desserts where a crisp, crumbly crust complements the creamy filling. The mix streamlines dessert preparation, allowing for more time to be spent on the filling and presentation, making it a popular choice for both novice and experienced cooks.
Ingredients Needed for Jell-O No Bake Crust
To prepare a Jell-O No Bake Crust, you’ll need a few simple ingredients, ensuring a quick and effortless dessert base. The core component is, of course, the Jell-O No Bake Crust Mix itself, which typically contains graham cracker crumbs and sugar. However, you’ll need to supply a couple of additional items.
Firstly, you’ll require melted butter or margarine. This acts as a binding agent, holding the crumbs together to form a cohesive crust. The amount of butter needed is usually specified on the Jell-O No Bake Crust Mix packaging, so be sure to follow those instructions carefully for best results.
Additionally, some recipes or personal preferences may call for a small amount of extra sugar. While the mix already contains sugar, adding a tablespoon or two can enhance the sweetness, particularly if you’re using a less sweet filling. With just these ingredients, you’re ready to create a delicious no-bake crust for your favorite dessert.
Step-by-Step Instructions for Making the Crust

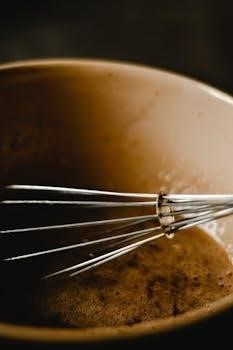
Creating a Jell-O No Bake crust is remarkably simple. Begin by gathering your ingredients⁚ the Jell-O No Bake Crust Mix, melted butter (or margarine), and a bit of extra sugar if desired. In a medium-sized bowl, pour the contents of the crust mix.
Next, add the melted butter to the bowl. Ensure the butter is evenly distributed over the crumbs. If you’re adding extra sugar, now is the time to incorporate it into the mixture. Using a fork or spoon, thoroughly combine the ingredients until the crumbs are uniformly moistened.

Once the mixture is well combined, transfer it to a 9-inch pie plate or springform pan. Press the crumb mixture firmly and evenly onto the bottom and up the sides of the pan. For a professional look, use the bottom of a measuring cup to compact the crust.
Finally, refrigerate the crust for at least 30 minutes, or preferably an hour, to allow it to set completely before adding your filling.
Alternative Crust Options
While the classic graham cracker crust is a staple for Jell-O No Bake desserts, numerous alternatives can add unique flavors and textures. For chocolate lovers, consider using crushed chocolate wafers or Oreo cookies. Simply remove the cream filling from the Oreos, crush the cookies into fine crumbs, and combine with melted butter as you would with graham crackers.
Another option is a cookie crust. Shortbread cookies, vanilla wafers, or even gingersnaps can be used. Each type of cookie will impart a distinct flavor to your dessert. For a nuttier flavor, try using crushed Nilla wafers combined with finely chopped pecans or walnuts.
If you’re looking for a gluten-free alternative, almond flour or gluten-free graham crackers can be used to create a delicious and safe crust. Coconut flakes can also add a tropical twist. Just toast the coconut flakes lightly before mixing them with melted butter and pressing them into the pan.
Tips for a Perfect Crust
Achieving the ideal no-bake crust requires attention to detail. First, ensure your crumbs are finely ground for a smooth texture. A food processor works wonders, but a resealable bag and rolling pin also suffice. Evenly moisten the crumbs with melted butter, ensuring no dry patches remain. This binds the crust together.
Press the mixture firmly and evenly into the pie plate or pan. Use the bottom of a measuring cup to create a uniform surface. Chill the crust for at least 30 minutes, or even better, an hour, to allow it to firm up. This prevents it from crumbling when you add the filling.
For an extra layer of flavor, consider adding a pinch of salt to the crumb mixture. If you’re using a springform pan, line the bottom with parchment paper for easy removal. Finally, don’t be afraid to experiment with different types of crumbs and flavorings to create a unique and delicious crust.
Troubleshooting Common Crust Problems
Even with careful preparation, no-bake crusts can sometimes present challenges. A common issue is a crumbly crust that falls apart when sliced. This usually stems from insufficient moisture. Ensure you’ve thoroughly combined melted butter with the crumbs, adding a touch more if needed until the mixture holds together when pressed.
Another problem is a soggy crust. This can occur if the filling is too moist or if the crust wasn’t chilled sufficiently. To avoid this, make sure to chill the crust thoroughly before adding the filling, and consider using a thicker filling.
If your crust sticks to the pan, try greasing the pan lightly before pressing in the crumb mixture. For stubborn sticking, line the pan with parchment paper. Finally, if your crust is too hard, it may be due to over-chilling. In this case, let it sit at room temperature for a few minutes before serving.
Jell-O No Bake Cheesecake Recipe
Indulge in a classic dessert with this easy Jell-O No Bake Cheesecake recipe. Begin by preparing the crust using a Jell-O No Bake Crust Mix, following the package directions. In a separate bowl, combine the cheesecake filling mix with cold milk. Beat with a mixer until smooth and creamy, ensuring no lumps remain for a velvety texture.
Gently spoon the filling over the prepared crust, spreading it evenly. For an elegant touch, swirl in some fruit preserves or a drizzle of chocolate. Refrigerate the cheesecake for at least one hour, or until the filling is firm.
Before serving, garnish with fresh berries, whipped cream, or chocolate shavings. This no-bake cheesecake offers the rich, creamy flavor of traditional cheesecake without the fuss of baking. The minimal prep time makes it perfect for gatherings, parties, or a simple treat.
Customizing Your Jell-O No Bake Dessert
Unleash your creativity and personalize your Jell-O No Bake dessert with a variety of delicious additions. For a fruity twist, fold in fresh berries, diced peaches, or mandarin oranges into the cheesecake filling. Alternatively, create a decadent chocolate version by adding cocoa powder or chocolate chips to the mix.
Elevate the flavor profile with extracts like vanilla, almond, or lemon. Swirl in fruit preserves, caramel sauce, or Nutella for added richness and visual appeal. Consider layering different flavors of Jell-O pudding for a colorful and unique dessert.
For a festive touch, top your creation with whipped cream, sprinkles, or crushed cookies. These simple customizations transform a classic no-bake dessert into a personalized masterpiece, perfect for any occasion. Experiment with different combinations to discover your signature Jell-O creation and impress your family and friends.
Storage Instructions
To maintain the freshness and quality of your Jell-O No Bake dessert, proper storage is essential. After preparing your dessert, cover it tightly with plastic wrap or transfer it to an airtight container. This prevents the dessert from drying out and absorbing odors from the refrigerator.
Store your Jell-O No Bake dessert in the refrigerator for up to 3-4 days. The cool temperature helps to maintain the texture and prevent bacterial growth. If you notice any changes in color, texture, or odor, it’s best to discard the dessert.
For optimal results, avoid storing the dessert near strong-smelling foods, as the Jell-O can easily absorb those odors. When serving, remove only the amount you intend to eat and return the rest to the refrigerator immediately. Following these simple storage instructions ensures that your Jell-O No Bake dessert remains delicious and safe to enjoy for several days.
Freezing Instructions
While Jell-O No Bake desserts are best enjoyed fresh, freezing can be an option for longer storage. However, it’s important to note that freezing may alter the texture of the dessert, particularly the filling, which can become slightly grainy upon thawing. To minimize this, ensure the dessert is fully set before freezing.
Wrap the dessert tightly in plastic wrap, followed by a layer of aluminum foil or place it in an airtight, freezer-safe container. This will help prevent freezer burn and maintain the quality of the dessert. For best results, freeze for no longer than 2 weeks.
When ready to serve, thaw the dessert in the refrigerator for at least 3 hours. This slow thawing process helps to minimize texture changes. After thawing, the dessert may release some liquid; simply drain it off before serving. Keep in mind that the texture may not be exactly the same as a freshly made dessert, but it will still be enjoyable.
Other Jell-O No Bake Dessert Ideas
Beyond the classic cheesecake, the Jell-O No Bake concept lends itself to many delicious variations. Consider creating parfaits by layering the crust mixture with Jell-O pudding, whipped cream, and fresh fruit. This provides a delightful mix of textures and flavors. Another fun idea is to make mini cheesecakes in individual cups, perfect for parties or portion control.
Experiment with different flavors of Jell-O pudding to customize your desserts. Chocolate, vanilla, lemon, and pistachio are all excellent choices. You can also add extracts or flavorings to the pudding for an extra burst of flavor.
For a more decadent treat, try incorporating cookies or candies into the crust or filling. Crushed Oreo cookies, chocolate chips, or peanut butter cups can add a delicious twist. Don’t be afraid to get creative and experiment with different combinations to find your perfect no-bake dessert. Consider a berry swirl for a beautiful and tasty treat. The possibilities are truly endless!